Hello Fellow Yuneec Pilot!
Join our free Yuneec community and remove this annoying banner!
Sign up

Breeze open and replacement body

Joined
Jan 15, 2017
Messages
2
Reaction score
0
Age
48
Hello,
Can anybody help me to find video or pdf FAQ how to open the body of Yuneec Breeze? We have a little crash landing and now have to change its body. We need an advice how carefully open the body? Maybe you have already done and repaired it before?
Thank you.
 
Join the facebook groups called yuneec breeze user and yuneec breeze user support

Sent from my LGLS675 using Tapatalk
 
  • Like
Reactions: FLYXLSA
Same here, the glass window on the bottom shattered - I think it's glass. Wondering if the glass can be replaced without changing out the whole body. It seem to work without it, but the lenses aren't protected.
 
Same here, the glass window on the bottom shattered - I think it's glass. Wondering if the glass can be replaced without changing out the whole body. It seem to work without it, but the lenses aren't protected.

What would happen if you bought a cheap GoPro filter?
Tape it at first and then glue it on if it works... Like this?
I'd measure it but mine is out in California being fixed.

Amazon.com: WoCase Camera Ultra Violet UV Lens Filter Protector For GoPro HERO4 HERO3+/3 Camera: Camera & Photo

Filter.jpeg
 
That's actually an interesting idea! I'm first going to try to get it repaired under warranty since the crash was caused by the Breeze suddenly spinning in a death spiral out of control which was not my fault - I just told it to take off. If for some reason they won't fix it - which would be disappointing - then I will give that a try. Thanks.
 
Similar thing happened to mine. I tied a string to it to do some testing. Whenever I turned the GPS on, it went into a wacko spiral. First flight it crashed with no damage so I was lucky. It flew inside and outside with the GPS off just fine. So far, Yuneec has been good on support.
 
  • Like
Reactions: andrewsilver
Same here, the glass window on the bottom shattered - I think it's glass. Wondering if the glass can be replaced without changing out the whole body. It seem to work without it, but the lenses aren't protected.

Unfortunately,no. Yuneec sells the whole bottom assembly as a part with the glass. The two halves snap together with tabs that also tend to break off in belly crashes where bottom gets struck. Most people need a new bottom after hard crash anyway from broken tabs hence the single part. It's a special polarized glass from what I can tell and seems pretty proprietary.


Sent from my iPhone using Tapatalk Pro
 
Do not attempt to split the body apart. You will break it. I just did mine and here is the way I did it.

After about 7 hours of tearing it apart, there is a simple way to replace the body. Will take about 1 hour.

1. Remove the wings.
2. Remove the landing gear. Two of the landing gears will have a single gray wire attached. You have to unsnap the landing gears with the wires attached. Inside, you will find a flat circuit board. It lifts right out.
3. On the bottom of the drone, you will find four plugs with three wires attached that are coming from the wings. You need to disconnect those.
4. You also have the wires that are on the poser button side. They are opposite the camera side. They need to be disconnected also.
5. At this point, you need to use tweezers to push in the rubber shock absorbers to release the board.
5a. When you remove the circuit board, you will have a wire that is going to the plugin for the battery. Be careful and turn the board sideways. This will let you remove the two screws holding down the battery plugin. After you remove the screws, use a small screwdriver to push the plugin out. I pushed from where the battery slide in.
6. On top of the drone, you need to take the small cover off. I used a small pocket knife to release it.
7. Unplug the wire and remove the four screws.

At this point everything should come right out. You will have to pass the little circuit boards from the landing gear through the wings to remove them.

One thing to remember is that the four sets of wires with 3 wires coming from the wings have to be put back in the same locations on the new body. Two of the wires have red marking on them. They have to be on the same side of the drone.

Let me know if you have any more questions. Hope this helps.

The H has the same tab and tongue clip attachment and is meant to be opened. I don't think removing everything is what Yuneec expects you to do or it'd be one piece body like others have..I've fixed two no problem and have not removed internal parts as the top has survived both times and the bottom took the hit and already popped off at impact..The glass breaks and it's a new bottom because that's how you replace that special glass. Unless your motherboard took a hit, I don't believe you are supposed to go through all that removal. Call a Yuneec tech and ask them what they do or how they pop it open because I assure you that's way to labor intensive and they did design it for separation of the two halves.


Sent from my iPad using Tapatalk Pro
 
I'm with the same problem, did you get it? How did you do it? Thank you

Hello. It's not difficult job to open the body. Here is the instruction (see bottom text), that I have got from parts shop (I've used it with success).
But! I whould like to show you one thing - you can see the button near usb port (picture with red arrow). Then body closed, you can use needle. Does anybody know - what is it? Is it the button of "factory settings" or smth. else?

=======

Instruction:

The cover is snapped onto the body of the Breeze. If you are discarding the one currently installed, you do not need to worry about damaging the main body but the cover's tabs that lock it into place will likely break. In the rear of the drone where the battery is installed you can see where several pieces of plastic are layered. Insert a flat tool between the outer most layer where there is a small gap. If the tool is wide enough (screwdriver) rotate the tool as if you were loosening a screw while the tool is between the layers. This will unlock at least one of the tabs in the back. If the second lock tab in the back did not release, repeat procedure on the other side to release the back of the cover. If you are discarding the cover, pry the cover off it will pivot at the front and the two small tabs at the front of the cover will break off. If you are not discarding the cover, after the back is released, carefully use a flat tool to work down the sides of the cover towards the front using the same rotating motion used to release the rear tabs. THE TABS IN THE FRONT BREAK VERY EASILY. Once the side tabs are released the cover can be pivoted creating enough room between the cover and the body to use a tool and release the tabs in the front without breaking them. This is difficult and our technicians often break the tabs when attempting. Installation is opposite of removal, starting in the front of the drone hooking the front tabs and pivoting the cover to lock the rear. The front tabs are very easily broken and no resistance should be felt fastening the front in the correct position.
 

Attachments

  • P70122-152030-1.jpg
    P70122-152030-1.jpg
    312.2 KB · Views: 183
  • P70122-174241.jpg
    P70122-174241.jpg
    2.1 MB · Views: 177
  • P70122-152037.jpg
    P70122-152037.jpg
    2.5 MB · Views: 167
Hello,
Can anybody help me to find video or pdf FAQ how to open the body of Yuneec Breeze? We have a little crash landing and now have to change its body. We need an advice how carefully open the body? Maybe you have already done and repaired it before?
Thank you.
Ok so it's not to hard, run your finger under the body frame and it kind of just snaps off. Sadly I had a serious crash and it came off, but now it snaps on easily.
Here's the crash I had.
 
I was amazed at how easy the bottom cover is to take off. I pried the cover loose just using my finger by starting at the two indents at the back battery area. Once I loosen those two spots, the cover flew off and landed on my rug. A little surprising actually.

Now need to see if these will work or you need the special glass lens:
High Quality 100pcs 22-25mm Glass Microscope Cover Slide Round Blank Slide | eBay
 
DSC02294.JPG I just crashed Breeze from 20 feet on to concrete, it's in about 10 pieces. for the most part it looks OK. the blades are messed up but no other plastic or glass issues. I had a small crash in the house on the carpet and 1 of the antenna legs came off. that was it. I thought the gray wire was there to keep the landing foot near the breeze. had no idea it was an antenna wire. I believe that that as the root cause for the 20 foot crash.


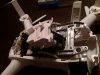
My problem is a gray antenna wire is disconnected from somewhere. With the camera facing towards me, it appears the right side has a gray wire connected. I'm guessing the left is where my wire needs to go.

The bottom has come off with no broken tabs - so that's good.
I'm trying to figure out the best way to open the body along the line near the USB door?
I see 2 brass screws near the camera... maybe 2 screws near the battery opening?
would I need to remove the motors?
Maybe My thinking is totally wrong?

Any help or suggestions would be great!


UPDATE to the above
Just noticed the step by step text posted by jkvidrine, Feb 13, 2017

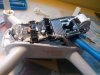
The antenna wires that are in the 2 landing legs, plug into the A9 board. You'll need to remove almost every connection and a board, to get to where the WiFi plugs are. Sadly in my case, the wire pulled out from the plug. I see no way to reconnect the wire to the plug. I have ordered a new set of landing feet with antennas, wires & plugs. When I put it back together, I'm going to try to add some hot glue to the Antenna wire to make it harder to pull out and some on the landing feet containing the antennas.
 
Last edited:

New Posts

Members online

Forum statistics

Threads
20,977
Messages
241,826
Members
27,377
Latest member
annamiller