Hello guys,
This is my first post here and I've been Typhoon H owner just a couple of months and have crashed it twice
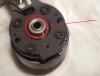
Gimbal mount got broken and those securing pins in it. Fixed those and flew couple of times. At some point I noticed that tilting does not work correctly.
Dismantled CGO3+ and checked slip motor wires etc. Did calibration from hidden menu in ST16 many times. No success.
To be accurate, tilting motor runs let's say 20 degrees. I mean when switched to V -position, it turns as it should.
In other positions tilting runs so that it points bit lower than horizontal line.
BTW, I cannot do gimbal calibration fully. It just stops after a couple of seconds. I've also tried rebinding and pressing those reset buttons in camera.
Any help appreciated,
-Sami-
This is my first post here and I've been Typhoon H owner just a couple of months and have crashed it twice
Gimbal mount got broken and those securing pins in it. Fixed those and flew couple of times. At some point I noticed that tilting does not work correctly.
Dismantled CGO3+ and checked slip motor wires etc. Did calibration from hidden menu in ST16 many times. No success.
To be accurate, tilting motor runs let's say 20 degrees. I mean when switched to V -position, it turns as it should.
In other positions tilting runs so that it points bit lower than horizontal line.
BTW, I cannot do gimbal calibration fully. It just stops after a couple of seconds. I've also tried rebinding and pressing those reset buttons in camera.
Any help appreciated,
-Sami-