Hello Fellow Yuneec Pilot!
Join our free Yuneec community and remove this annoying banner!
Sign up

Typhoon H batteries alternate

Joined
Mar 4, 2019
Messages
400
Reaction score
211
Age
55
I have posted about the 3DR Solo batteries on here before but I wanted to mention this hack once again.
If you are like me, on a fixed budget, batteries for the Typhoon H and the Q500 can get expensive.
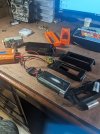
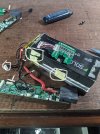
A friend crashed his 3DR Solo and gave me a couple of the batteries he didn't need anymore. I opened one of the batteries up and found the Lipo cells are the exact same as the Q and H drones.
You can buy brand new Solo batteries for less than 40 bucks on eBay and repurpose them to use in the Q or H.
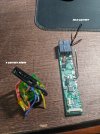
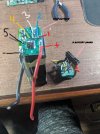
The Q500 only uses two of the three cells but the H uses all three. Make sure to use a good battery protection board and a good charger when using these batteries.
I have been using Solo batteries now for over a year and have had no issues. As a matter of fact, the Solo cells seem to hold up better than the original Yuneec cells.
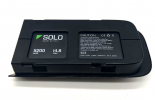
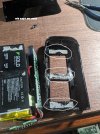
Take a look at this picture of the Solo battery and you will see the specs are identical.

Happy flying!
 

Attachments

  • s-l1600.png
    s-l1600.png
    1.1 MB · Views: 59
How do you do this exactly... Aren’t they very different connections? Are they even the same dimensions?

Very much like the concept of smart batteries over these bricks of hellfire.
 
H Plus uses 4 cells at 15.2v, the H is 14.8v so I assume these cells would not do for a H plus, I have one pack with a dead cell other 3 OK.
 
....so I assume these cells would not do for a H plus, I have one pack with a dead cell other 3 OK.
They are not the same chemistry. I think mixing cells would be a real bad idea. If nothing else the flight/charging process will kill the pack. If you fly /charge according to the needs of one cell type, it will destroy the other.
 
question? has nobody had the idea to make a batterypack with cells from an E-bike.
those cells are 3.7V and 3.3Ah, weight is 47gr. 4S 2P is 8 cells , capacity is then 9600mAh.... these will fit in a standard typhoon H housing or in a 3 printed housing total weight will be less than 500gr. (390 gr for batteries and printed housing is 42 gr)
I will give it a try in the next days ....
 
Make sure that the LiIon cells are able to provide high current, most of them do not.
I would calculate peak current 50A, means 25A per cell in case of 2P.

br HE

Edit: And 10A permanent.
Exactly. The C rating on the Solo batteries is the exact same as the Yuneec. The numbers from both battery cells are identical.
 
  • Like
Reactions: h-elsner
I am working on this project again. I have two batteries already working. You have to remove both battery boards from the cells and solder the H board to the 3DR cells.
What I love about the 3DR batteries, is they last so much longer than Yuneec batteries do.

****BE VERY CAREFUL IF YOU TRY THIS. YOUR BATTERY CAN GET HOT AND BURN YOU AND YOUR HOME IF YOU PUNCTURE THE CELL.****

First, discharge the battery down as low as you can. (3.6 to 4 volts)
I use a hot knife to cut the battery cover (be extra careful not to hit the cells). Take your time and go slow.
Set the H battery shell to the side and use fingernail clippers to cut the small blue, white, and yellow wires. Be careful not to touch any solder points as they could spark.
I use a small piece of black tape to cover the end of each wire I cut from the cells so I don't risk touching them together while working.
Pull the 14 gauge red wire back enough to cut the cell's tab from the cell. The red wire will have a smaller red wire soldered to the same tab be sure to keep these together.
Do the same for the 14 gauge black wire and battery tab. It also has a small black wire attached to it.
I cover the bad cells with black tape and take them to the recycling center.

The 3DR Solo battery is much easier.
I use a hot knife to cut under the lip of the top cover. I only cut one end and one side and then you can pry it apart.
The solo battery has two-sided tape holding it to the lower part of the shell. I use baby oil to loosen the tape from the battery.
I then unplug the small board from the longer board.
Then unplug the small connector from the longer board.
There is a temperature sensor under the yellow tape. Just pull it out.
Cut the two 14 gauge wires (red and black) - and + close to the board. Don't allow any of these wires to touch anything.
You will have to remove the clear yellow tape on top of the battery to see the cell numbers and cut the small black wires.
Cut the five black wires with the small white connector near the battery. Be very careful not to touch each soldered wire to another.
These are the wires you will attach to the H battery board.
Now just follow the board numbers on top of the H board, and match them to the 3DR solo battery.
Looking at the top of the 3DR battery, with the red wire to your right, you will see the small black wires you just cut. The picture will show you the wiring diagram.
Using the wires from the H battery board, attach them to the Solo battery. From right to left, looking at the top of the Solo battery-
Small red wire to number 4 Small blue wire to number 3 Small white wire to number 2 Small yellow wire to number 1 Small black wire to number 5
The 14 gauge red wire to B+ The 14 gauge black wire to B-
Be sure to cover all the soldered wires and boards with TAPEGO high-temperature, heat-resistant tape.
Make sure the wires are not going to touch inside the cover.
Once you have all the wires back together, I use a B6 Balance charger to balance the cells first, then I do a normal charge.
I put everything inside the H battery shell and glued the sides back together. I also put a piece of black high-strength tape across the battery where I cut it open.

Good luck,

I was in a hurry working this out. If I missed something, please let me know.
 

Attachments

  • PXL_20231005_164032996.jpg
    PXL_20231005_164032996.jpg
    2.8 MB · Views: 21
  • PXL_20231005_164845755.jpg
    PXL_20231005_164845755.jpg
    3.8 MB · Views: 20
  • PXL_20231005_181914273.MP.jpg
    PXL_20231005_181914273.MP.jpg
    2.3 MB · Views: 17
  • PXL_20231005_181803787.MP.jpg
    PXL_20231005_181803787.MP.jpg
    3.3 MB · Views: 18
  • PXL_20231005_182806858.MP.jpg
    PXL_20231005_182806858.MP.jpg
    3.4 MB · Views: 16
  • PXL_20231005_185730542.MP.jpg
    PXL_20231005_185730542.MP.jpg
    3.8 MB · Views: 16
Last edited:
H Plus uses 4 cells at 15.2v, the H is 14.8v so I assume these cells would not do for a H plus, I have one pack with a dead cell other 3 OK.
Both of them use LIPO batteries. The difference is the H Plus uses LIPO HV batteries. The cells have the same chemicals though, so you could use a H battery in an H Plus. This means you could use the 3DR Solo battery to build a battery for your H Plus but you can't use your H Plus charger to charge it because the wiring is not the same. If you have an aftermarket charger, no problems. I would not mix the standard cells with an HV cell since they don't charge the same.
 
I am working on this project again. I have two batteries already working. You have to remove both battery boards from the cells and solder the H board to the 3DR cells.
What I love about the 3DR batteries, is they last so much longer than Yuneec batteries do.

****BE VERY CAREFUL IF YOU TRY THIS. YOUR BATTERY CAN GET HOT AND BURN YOU AND YOUR HOME IF YOU PUNCTURE THE CELL.****

First, discharge the battery down as low as you can. (3.6 to 4 volts)
I use a hot knife to cut the battery cover (be extra careful not to hit the cells). Take your time and go slow.
Set the H battery shell to the side and use fingernail clippers to cut the small blue, white, and yellow wires. Be careful not to touch any solder points as they could spark.
I use a small piece of black tape to cover the end of each wire I cut from the cells so I don't risk touching them together while working.
Pull the 14 gauge red wire back enough to cut the cell's tab from the cell. The red wire will have a smaller red wire soldered to the same tab be sure to keep these together.
Do the same for the 14 gauge black wire and battery tab. It also has a small black wire attached to it.
I cover the bad cells with black tape and take them to the recycling center.

The 3DR Solo battery is much easier.
I use a hot knife to cut under the lip of the top cover. I only cut one end and one side and then you can pry it apart.
The solo battery has two-sided tape holding it to the lower part of the shell. I use baby oil to loosen the tape from the battery.
I then unplug the small board from the longer board.
Then unplug the small connector from the longer board.
There is a temperature sensor under the yellow tape. Just pull it out.
Cut the two 14 gauge wires (red and black) - and + close to the board. Don't allow any of these wires to touch anything.
You will have to remove the clear yellow tape on top of the battery to see the cell numbers and cut the small black wires.
Cut the five black wires with the small white connector near the battery. Be very careful not to touch each soldered wire to another.
These are the wires you will attach to the H battery board.
Now just follow the board numbers on top of the H board, and match them to the 3DR solo battery.
Looking at the top of the 3DR battery, with the red wire to your right, you will see the small black wires you just cut. The picture will show you the wiring diagram.
Using the wires from the H battery board, attach them to the Solo battery. From right to left, looking at the top of the Solo battery-
Small red wire to number 4 Small blue wire to number 3 Small white wire to number 2 Small yellow wire to number 1 Small black wire to number 5
The 14 gauge red wire to B+ The 14 gauge black wire to B-
Be sure to cover all the soldered wires and boards with TAPEGO high-temperature, heat-resistant tape.
Make sure the wires are not going to touch inside the cover.
Once you have all the wires back together, I use a B6 Balance charger to balance the cells first, then I do a normal charge.
I put everything inside the H battery shell and glued the sides back together. I also put a piece of black high-strength tape across the battery where I cut it open.

Good luck,

I was in a hurry working this out. If I missed something, please let me know.
I wanted to add some information I recently discovered. The 3DR Solo battery is much lighter than the original Typhoon H battery. 6oz to be exact.
 
question? has nobody had the idea to make a batterypack with cells from an E-bike.
those cells are 3.7V and 3.3Ah, weight is 47gr. 4S 2P is 8 cells , capacity is then 9600mAh.... these will fit in a standard typhoon H housing or in a 3 printed housing total weight will be less than 500gr. (390 gr for batteries and printed housing is 42 gr)
I will give it a try in the next days ....
finished and ready to test ( to windy today) 8 cells 18650. 4S 2P each cell 2950 mAh makes 5900mAh, 16,4 V (charged) weight is 475gr. the housing is 6 mm longer than the standard Yuneec to fit the cells, reused the pcb and the connector. printed in PETG.
 

Attachments

  • IMG_20231116_172741.jpg
    IMG_20231116_172741.jpg
    4.1 MB · Views: 17
Last edited by a moderator:
... the housing is 3 cm longer than the standard Yuneec...
The images seem almost the same length. Is "3 cm longer" correct?
Can you share the printer files needed for the project?
This is some good-looking progress. If the initial flight tests go as planned, it will be even better. Regardless of flight test results, there is much already accomplished here.
Good work.
 
finished and ready to test ( to windy today) 8 cells 18650. 4S 2P each cell 2950 mAh makes 5900mAh, 16,4 V (charged) weight is 4750gr. the housing is 6 mm longer than the standard Yuneec to fit the cells, reused the pcb and the connector. printed in PETG.
YES! I actually did this about a year ago. The 3DR Solo battery hack is just something I noticed one day while repairing one of their drones. I am also building batteries for the DJI Phantom series drones.
Looking forward to hearing how your test flight went.
 
The notes in the photo in post #15 states 475g as opposed to OEM of 558g.

I edited post #15 to have narrative match the attached photo.
 
  • Like
Reactions: tigerbel
finished and ready to test ( to windy today) 8 cells 18650. 4S 2P each cell 2950 mAh makes 5900mAh, 16,4 V (charged) weight is 475gr. the housing is 6 mm longer than the standard Yuneec to fit the cells, reused the pcb and the connector. printed in PETG.
I was always under the impression the 18650 cells would not work for drones due to the C ratings.
I guess it depends on the type of drone you are using them in. Have you been able to test this yet?
 
  • Like
Reactions: Steve Carr

New Posts

Members online

Forum statistics

Threads
20,977
Messages
241,831
Members
27,384
Latest member
TroyBoy