Hello Fellow Yuneec Pilot!
Join our free Yuneec community and remove this annoying banner!
Sign up

NOOB CRASH - QUICK START PROP TIGHENING NG - READ THIS

Joined
Dec 25, 2017
Messages
9
Reaction score
1
Age
67
Location
Florida
Hello All,

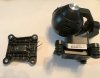
I received a Q500 4K for Christmas. Set things up per quick start. Wound up with a prop that was not tight enough. The Q (now named Phoenix) through off a blade about 12 ft. off the ground. With only 3 props, Phoenix inverted and augured into the ground. The CGO3 split off the gimble tearing wires off the gimble circuit board. The brunt of the impact was one arm of the air frame cracking frame members and totaling one propeller blade.

Joining the board last night and looking around a bit more today, I can see I'm not alone on this noob mistake. The quick start card language is misleading at best because it implies the blades can be tightened without the wrench and cautions against over tightening, without supplying important details.

The damage to Phoenix is recoverable, I will detail this in a separate thread.

SIMPLE MESSAGE - BE SURE YOUR PROPS ARE CORRECTLY TIGHTENED BEFORE EACH FLIGHT.

Do not rely on quick start instructions. Here is the basic process in video for prop tightening

 
Last edited:
it implies the blades can be tightened without the wrench
Actually I have never used the tool to install a prop. I hold the motor with one hand and tighten the prop with the other until it feels snug. I've never lost a prop using this method. You do need to make sure the rubber o-ring is in place under the prop. The props should tighten down against the o-ring.
 
Steve,

Thanks for the response. O-rings were in place. I ran the blades all down by hand and snugged, holding the motor housing. My wife was out in the field watching the flying. She said one propeller spun up of one arm and lofted like a helicopter. The same time this occurred, I was in the process of stopping a climb and resuming rotation using "smart circle". Clearly the rotor had enough energy to keep turning as the motor was probably slowing down.

As an absolute noob, I never really stopped to consider the dynamics involved. My training (as an engineer) should have helped inform that looseness posed a greater risk than slight over tightening. My primary reason for positing this is to keep other noobs from making this same mistake.

Not enough prep on my part :( Oh well, now I'm going to get to learn the in's and out's, as I've already ordered replacement air frame and will be transferring / rebuilding. I will be posting details of this in the help forum, in case anyone else finds themselves with air frame problems. I'm going to connect the interface tomorrow and see if it turns up other issues (hopefully not).

I will try to patch up this air frame (maybe) based on advice from experts here when I post up details. I'm also going to post up the log file for experts here to look at in case something else went wrong. Kind of don't think so, as Phoenix was behaving very well right up until it decided to throw a blade.

Thinking about the style of connection, I hope people are periodically replacing these motor O rings. O ring compression created friction is the only thing that keeps blades on during motor deceleration. I was in absolute disbelief as this event unfolded. Glad I wasn't flying higher. I've tested the CGO3 out and except for the wires that (hopefully) only need resoldering, the camera survived the crash landing.
 
O ring compression created friction is the only thing that keeps blades on during motor deceleration.
Right. The reason I mention the o-ring is because there have been cases where the motor threads were not cut deep enough on the shaft which prevented the prop from compressing the o-ring. It's a simple matter to compare the motor shafts for thread depth.

I've tested the CGO3 out and except for the wires that (hopefully) only need resoldering,
Can you post a picture of the damaged camera wiring? If it's the 3 wires that connect to the contacts on the Q500 camera mount, then you can simply use the short cable that connects the camera to the Q. The three contacts on the top of the gimbal are not reliable over time.

As you may know, the telemetry is stored on the sd card under the battery in the ST10. If you upload the telemetry file from that flight, simply add a .txt to file name. Files that end with .csv will not upload on this site.
 
  • Like
Reactions: specsalot
Right. The reason I mention the o-ring is because there have been cases where the motor threads were not cut deep enough on the shaft which prevented the prop from compressing the o-ring. It's a simple matter to compare the motor shafts for thread depth. . .

Thanks Steve. I’m pulling night shift at work and don’t have a lot of access right now. Interesting point about motor thread depth. New motors seem by appearance to have a greater length of shaft threaded. I willl look at this tomorrow in detail.

The gimble pic is attached. I used the connection cable and the steady grip to prove operation of the camera. There is a thread here about building break away pin type connections. Was thinking about trying that.

I plan to post the telemetry file along with picks & procedure I will have followed for the air frame change in a new thread in the Q500 4K Help section out in time. I just ordered the air frame and some other supplies / spares tonight. Air frames seem to be going out of stock at some of the parts suppliers in the last day I’ve been looking. My order ETA in second week of Janurary. So it will be a while.

I appreciate your input and support. I’m new to this hobby, but there are clearly a lot of seasoned experts on this board. I’m looking forward to learning a lot here and in time maybe helping others.
 

Attachments

  • 8E81B0D9-48A5-47BF-9640-A18DE8A4962F.jpeg
    8E81B0D9-48A5-47BF-9640-A18DE8A4962F.jpeg
    1.8 MB · Views: 29
The gimble pic is attached.
You can cut those wires off in a staggered cut so they don't touch each other and use the cable. Use wire ties loosely through the dampers to secure the camera. I had a mount break once, so I also run a paracord thru two of the wire ties just to make sure the camera stays with the Q. After a crash, inspect the camera slide mount carefully for damage or cracks.

CameraRetention.jpg
 
Thanks, Steve - I will make the inspection you've suggested.

Good News For Today. I reassembled the CGO3 mount (still missing a rubber), reattached and connected it to the airframe. Took the unit outside for no-fly testing. The CGO3 operates and the airframe started up. So the core electronics/components seem to be intact. Haven't sorted the telemetry file as of yet. I will (hopefully) post this later today.

Great picture of how you've rigged CGO3 to remain with the airframe in the event of a mishap. Great idea.
 
Last edited:
Somehow the files on the microSD card got scrambled in handling the card. I connected this card to both a Mac & PC. Both deliver messages saying the card is unreadable - Any ideas on this. Maybe settings issues? Don't want to reformat the card as of yet.
 
Thanks Thomas - I'm going to place it back into the ST10+ and see if it can be accessed through that device. If not, it's going to be reformatted (fat32) and retested. There is a lot of great info on this board which I'm only just beginning to tap. Repair spares are already shipped. I will post a repair thread in Q500 4k Help.

As part of airframe change I purchased carbon fibre reinforcement plates (from Carolina Drones), because of comments on this board about motor base cracks. Hopefully, that will be a useful mod for this unit.
 
Thanks Thomas - Parts are inbound, I'm excited about getting Phoenix in the air. Up until the propeller flew off, I was enjoying flying. Had some very positive impressions of this bird. Stopped by a local hobby shop and spoke to the owner who has a Q500. He spoke very highly of these birds and said they are great video platforms. Looking forward to the fun :)
 
Somehow the files on the microSD card got scrambled in handling the card. I connected this card to both a Mac & PC. Both deliver messages saying the card is unreadable - Any ideas on this. Maybe settings issues? Don't want to reformat the card as of yet.
if the camera was not turned off before your crash you will get a message of corrupted or unreadable files , don't reformat the card just yet . if you can get your camera working or you have a friend that has a Q500 camera , insert the SD card and start the camera and then turn it off it will end the video and closed the file . my first Q500 had crashes and the same thing happened to me ,the camera is toast but i bought a new Q500 and inserted the SD card in and saved the file .
good luck
 
Thanks for the insight NRRTRAINS :) These are the kinds of details that NOOB's need to know. Much appreciated. Repair tools and spares are in town (per all the order tracking info) and I should have them in my hands by tomorrow (again per tracking). Look for a thread in the help section where I hope to document the airframe replacement process.
 
Thanks for the insight NRRTRAINS :) These are the kinds of details that NOOB's need to know. Much appreciated. Repair tools and spares are in town (per all the order tracking info) and I should have them in my hands by tomorrow (again per tracking). Look for a thread in the help section where I hope to document the airframe replacement process.
the air frame replacement is not rocket science , take photos at each step , a lot of screws , keep note where the larger screws go . the only problem is the unsoldering of the motor wires from the ESC and re soldering , a little tight in the motor housing , just take your time , number each motor and the wiring and where they go in the new air frame . take loads of photos . i am rebuilding my air frame and taking my time no rush.
 
the air frame replacement is not rocket science , take photos at each step , a lot of screws , keep note where the larger screws go . the only problem is the unsoldering of the motor wires from the ESC and re soldering , a little tight in the motor housing , just take your time , number each motor and the wiring and where they go in the new air frame . take loads of photos . i am rebuilding my air frame and taking my time no rush.

Great Advice NRRTRAINS. I have started the process. Lots of pics being taken. Organizing screws as they come out, labeling things. Takes patience for sure.
 
  • Like
Reactions: DroneDog

New Posts

Members online

Forum statistics

Threads
20,955
Messages
241,591
Members
27,287
Latest member
wccannabis