Hello Fellow Yuneec Pilot!
Join our free Yuneec community and remove this annoying banner!
Sign up

Film-Making, Models, Composites & Drones

Ty Pilot

One Hexy Pilot
Premium Pilot
Joined
Feb 24, 2017
Messages
2,997
Reaction score
3,185
Location
Central Florida
Website
copperdawg.com
BACKGROUND

Okay so it's been a while since I made a video. Life, the stupid Covid thing, and other stuff has kept me away for too long. However, I have a couple videos in the works with a 3rd and 4th planned shortly afterwards. One or two will be in the same vein as my other videos - informational tutorial types about our favorite subject. However the other two videos (the first of which I plan to have done very soon), is like nothing you've ever seen. 🤫

With that in mind, I know many of you are into video production and the art of film production so I thought I would start a thread showing you some of the behind the scenes stuff I have been doing and perhaps tease some of the forthcoming video's. I'll just apologize now for a long thread but I think you'll find it interesting.

I (and I am sure many of you), have long thought about if it would be possible to make a video about drones and in particular - show the drone in flight? 🤔 For those that have tried, you know the extreme complexities this represents. Just getting a still image of a drone from another drone at close distance take some very precise coordination. A couple years back when I was testing and refining my SteadyDrive, I was able to achieve a little success in straight line flight where I had a friend fly his H Plus (also with a n SD) in a straight line while I pursued and moved within feet as seen in the short clip below.


EARLY ATTEMPT AT FILMING A DRONE IN FLIGHT


That test was encouraging, but it left no doubt that complex shots would be near impossible. For instance, image your typical Hollywood car chase as filmed from the car chasing's point of view. On streets, no problem but; with two separate remotely piloted vehicles - hang it up - not happening. So as the title suggests, the way to do something like air to air shots with a drone will have to be done one of two ways - Old School with models or Newer School with digital technology. Well right off the bat access to film level animation or animators is out of the question - and this from guy who has a deep background in design a 3d animation - for stills.

So I have been looking at some old school techniques combined with some modern technology such as composites and keying (green screen). And I must say it is stunning. I will not show any clips because that might spoil the videos but I can show you some of the stuff I am working on as well as a few still from the actual film.

MODELS

So, three videos I had planned would have varying degrees of this new effort, the first should be finished by Christmas and was the test bed to see if I could pull off these shots. With that these early shots were some of the most simple and straight forward which is why I shot it first. In it there are many clips of a drone flying from camera angles and in ways you just can't do in-camera. Some are composites and one or two will be models. Some of you know I was in RC for a long time and my favorite discipline was scale modeling - making miniatures of real planes. I've worked with and seen models used in films and they always disappointed in real life when you see one up close; while on screen, they work because the audience has suspended disbelief.

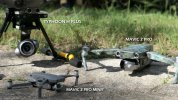
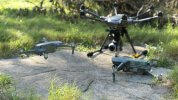
So for my films I would need two models, I bet you can guess which ones I needed - yep a Typhoon H Plus and a Mavic 2 Pro and I needed the Mavic 2 Pro first because it was 'starring' in the first video🤣 I made a post on another forum and suggested I had obtained a prototype "Mavic 2 Pro Mini" No one called me on it or had any questions. Here are just a few stills of the "Mini" Mavic.
All3.jpg

Flight1.jpg


So everyone that saw these pics just accepted what they were seeing. No One said "wait a minute, there's no such thing". Suspension of dis-belief achieved in a still photo from 2 feet away? Check!
The picture below shows the model's actual size.
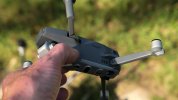
In Hand1.jpg


So now I know that model will work. I can't show anymore at this time . . . well I could but then I would have to . . . . . .you know. . . . :cool:


COMPOSITES - (Green Screening)


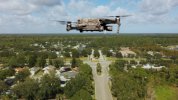
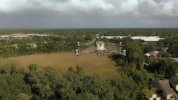
The major hurdle for me was that I was fairly good with compositing using Adobe After Effects but when they went to subscription prices fit-for-a-king, I bailed. But for the lest 9 months I have been working with the Studio Version of Davinci Resolve and it's effects engine - Fusion. Long story short, I've been doing some test plates over the last month or so and the results are blowing me away. Below are two frames from this first video and even though these are stills, the clips include maneuvering of the drone and staying in camera the whole time.
DroneFlightS.jpg

FromBehindS.jpg


BEHIND THE COMPOSITE

These clips were made by first flying where the camera would be. In the first shot, I used the H Plus and flew about 100 feet in a straight line and then turned 90 degrees to the right while panning the camera further aft, the frame you see is about fifty feet into the flight before the Mavic 2 peels away and flies the other direction (Ever see and old WWII film where fighter peel away)?

The second clip is a simple ascending flight out and because it was simple, it was the first completed plate and clip I made that will be used in a video.

One thing that makes or breaks a shot like these is: lighting. If the light and shadows on the ground don't match those of the aircraft the shot cannot work. For this reason, the two shots were shot within mintes of each other and cartefull attention was given to direction. In fact, most of the work goes into planning the shots rather than shooting them

Well, thats about all I got for right now, if you're into this sort of thing hope you enjoy and if you have any questions or ideas I would love to hear from you.
 
Last edited:
For reference, below are individual frames of video that make up the Composite seen above.

VIDEO PLATE

First a video is shot that will become the background for the composite. In this case the camera angle is almost horizontal. The drone is moving to the pictures right and then later turns left by 90 degrees. The length of this shot as well as the turning points are noted - so it may travel for five seconds, begin a left turn and pan that goes through 90 degrees taking 5 more seconds to complete from the end of straight travel.

PlateShotS.jpg


SUBJECT PLATE

Here is a frame from the video where I have a green screen stretched out in my backyard (notice the shadows of tree limbs), the drone is in a hover about three feet above the ground. The timing noted above (as well as where the sun is) is then applied to this video - I hover the drone for five seconds and then begin a left yaw, taking 5 seconds to rotate through 90 degrees.

GreenScreenS.jpg

FINAL COMPOSITE

Once the background of the subject plate is removed, the real work begins. Keep in mind that placement, size and rotation of the subject plate can be placed and key-framed within the Video/BG Plate. This is where ones eye plays the biggest part making the movement of the two plates seem as one. Once the movement is matched and satisfactory the task of color correction and grading becomes very important. When it's off slightly it just looks wrong so matching color, light and shadows is of supreme importance.

Because you now have a composite of two separate entities, as a filmmaker you have some incredible freedom to give an even more-cinematic look that if the shot was done in-camera. You'll note in the final composite I have blurred the background, while keeping the Mavic (subject) in tight focus. At any point I can change the focus. For instance if I wanted to rack focus to a point on the ground and put the subject out of focus this is achieved easily. In addition motion blur can (and should) be applied to further the look one is trying to achieve.

DroneFlightS.jpg
 
Last edited:
Amazing work, and I am not educated enough to tell you anything related to what you are trying do accomplish but I just want to ask.

These are what if's and by no means me telling you it can or cannot be done. Others more experienced then myself could help with these questions I am sure.

When I got my drone a few years back it was with the intention of being able to take shots of improvements to our golf course we were undertaking. I seem remember that that I read you could plot a course with your drone and basically let it do it automatically or through your plotted course. I never tried this but thought this would be great taking shots from my tees to my greens of each hole without my control which would not doubt not make it look as good.

If this is possible, and I am not sure it is, would it mean that you could basically build a flight pattern for one drone and copy it to the other drone but run the second drone 15 or more seconds behind it? and if that would be possible it should mean you could use the same flight plan but use a slightly different altitude to give it a different perspective?
 
  • Like
Reactions: Ty Pilot
No, no, not too long of a post at all. I too am into video production and work with Vegas Pro and various plug-ins. I knew that you had several drones and have always thought of you as one to put something like this together to help others. I think that it is an awesome thing for you to do this and await the next posting in this series.
 
  • Like
Reactions: PRFarm and Ty Pilot
Amazing work, and I am not educated enough to tell you anything related to what you are trying do accomplish but I just want to ask.

These are what if's and by no means me telling you it can or cannot be done. Others more experienced then myself could help with these questions I am sure.

When I got my drone a few years back it was with the intention of being able to take shots of improvements to our golf course we were undertaking. I seem remember that that I read you could plot a course with your drone and basically let it do it automatically or through your plotted course. I never tried this but thought this would be great taking shots from my tees to my greens of each hole without my control which would not doubt not make it look as good.

If this is possible, and I am not sure it is, would it mean that you could basically build a flight pattern for one drone and copy it to the other drone but run the second drone 15 or more seconds behind it? and if that would be possible it should mean you could use the same flight plan but use a slightly different altitude to give it a different perspective?

James, your question is a good one, and one I too have considered. With the Typhoon series, we've had the ability to run CCC or 'Curve Cable Cam(era)' missions. I've done two videos where I delve into the CCC capabilities of both the Typhoon and H Plus. The ability to store waypoints and run missions again and again does exist but if there is one aspect of this ability that may fall short in achieving air to air shots it is the Z axis or altitude.

In both the Typhoon and H Plus series (and I suspect 520 and H3), the mission waypoints are repeated fairly close but the altitude at each way point (I found) changes from run to run or on different days. I suspect this is due to the lack of accuracy; not only of the GPS, but also because of the barometers used to determine height of our drones.

In any case I have never tries such a mission (Dual aircraft running the same route) so I can't completely rule it out but I can say with confidence that; from a story telling perspective, there are better and easier alternatives that require far less effort. That said if one wanted to get the action as close to possible as real - there is no substitute for "in-camera" shots.

Still, as I re-watch that video clip I made of two Typhoons flying in formation it at times almost looks too smooth or fake, or maybe I have just got my brain turned around trying to recreate such a scene. 🤔
 
Wow. This is amazing work. I’m going to follow your progress.
You are undertaking an incredible project. I'm going to follow this closely.
No, no, not too long of a post at all. I too am into video production and work with Vegas Pro and various plug-ins. I knew that you had several drones and have always thought of you as one to put something like this together to help others. I think that it is an awesome thing for you to do this and await the next posting in this series.

Thanks guys glad you like this stuff too!
 
THE JOURNEY

When I first started thinking about these new videos, as I mentioned I decided to try two avenues, as I felt these were something I could accomplish - model-making and green screening. Whether or not it would be good enough to use in a video was unknown at that time so; I had to see what worked and what didn't. Dreaming is one thing, doing is another - as they say the proof is in the pudding.

As model-making is probably a strong point with me, I decided to go this route first, but there were many things to consider first.
  1. What scale would the models need to be?
  2. How detailed would the models need to be?
  3. What aspects of the models needed the most scrutiny?
Back to the models in a moment.

To answer these questions requires a little reverse-engineering of the purpose of the model. As I pondered the questions it became clear to me that; there has to be an over arching plan, but what was that? Since I am essentially an amateur videographer I have as yet taken the step that I needed to take. I needed a script and a story-line. To date all of my tutorial videos have a script that I use for both my VO and on screen discussion but I have never really sat down and written a story outline because I didn't need to.

With this new video I had the idea which is essentially an outline but that doesn't lay out everything that needs to be seen and/or in what order - I needed that - I needed a script and I also needed something like a list of all the shots that make up the entire video, and I needed to do this first. Well I have never done this and didn't know where to start and soon enough I could see; I was in deep water. 🤣 I had swam so far out I could no longer see the shore in fact.

So I sat down and started writing out what the story was. It does have voice over narration but it also has acting with dialogue, and upwards of seven separate shooting locations. So I came up with the idea to start with 3 separate documents: 1] The Narrators Script, 2] The Shot List (storyboard), and 3] The script for the onscreen dialog. Later I would combine all spoken words into a single script. The script and the shot list were written simultaneously (albeit over 3 months), because it was like building the walls of a house - one side supports the other as you go.

THE SCRIPT & SHOT LIST (sorry but I forgot to focus the lens):pno peeking;)
the top three pages are the shot list, colors represent which camera and which subject is in the shot and the bottom three pages are the Script and the colored words are the onscreen dialogue.

Script.jpg


Where was I? Oh yeah - the Models

With a script and more importantly the shot list/storyboard in hand, now I could see not only exactly the shots I had to get but now I could see precisely where the drone in flight scenes were and specifically, what the drone is doing. From this I could then determine which method of shooting would be best for a given scene - In-camera (real), Model or Composite. And from this I could answer my questions. . .
  1. What scale would the models need to be?
  2. How detailed would the models need to be?
  3. What aspects of the models needed the most scrutiny?
To put the model in flight, I had a plan so from this plan I determined that I needed the model to be light but it had to have detail that worked from two feet minimum out to 20 feet.
It took about 70 hours over a period of six weeks to build the 1/2 scale Mavic 2 Pro. I carved it out of Balsa wood and surfaced it with epoxy resin. All the surface details such as sonars cameras, LED lights, and so forth are there and the color is the stock gray. It has attachment points from every angle except the top so I can mount it in any plane I need to shoot from. I'll get into more about the model as we go.

So how would the model be used? How do we get the model in flight convincingly? I had several approaches in mind but the first idea (which was actually the concept that sprung off the entire idea) was to put it in the air. But How?

Wouldn't it be neat if they made a contraption that flew in the sky - but also had a camera - and what if that contraption could carry a model in a fixed position - and also had a way for the model to bank and climb, while the contraption's camera stays level, and keeps the model in focus????? Sorta? Wouldn't that be neat? 🤯

TheRigS.jpg


THE "RIG"

The concept was simple (in theory) - put the model on a rig or gantry, attached to the bottom of the H's Landing gear so as to swivel up for landing, but once in flight would drop into position for filming - In theory.

Let me tell you - take this out for a spin around the 'hood' and its like flies to you-know-what for spectators. ;)

The GOOD:
With correct positioning, only the thin wire is seen in frame and can easily be removed in post. The scenes in flight are breathtaking. When the H goes through a turn it banks and thus so does the model while the camera stays dead level. Interacting with the ground in certain ways gives an unbelievable point of view. The H Plus has enough power and authority so this is not an overload the rig boom is lightweight carbon fiber and the model weighs very little.

The BAD: Right off the bat, the focus-to-infinity lens of the C23 needs to be about double what it is from the model, but this extra length presents more than double the load on the front motors. My first gantry was about nine inches shorter and from test flights I consider the new length to be as long as I would try.

VERDICT: Strike one. I had envisioned this gantry doing about 70 percent of the in-flight shots and as it turns out will likely be retired and not used. As it turns out, this experiment forced me into other avenues that seem to be able to give me what I need. And the model still has a few tricks up it's sleeve - coming to a Youtube near you soon.

Flight2.jpg
 
Last edited:
I got hooked on cameras flying through the air as a little kid, while watching shows like Hawaii 5-0. They used lots of helicopter shots in that old series. And, I thought that it was to be the next big thing in movie making and the day would come when we had little cameras on smaller flying machines. That day came(for us consumers) about 6 or 7 years ago. The little kid in me still lives.

As additional food for thought, I suggest to watch the movie Edge Of Tomorrow also known as Live, Die, Repeat.

It looks like "the rig" is also designed to actually be flown by you. Have you considered painting the rig green and then hand holding the H+ by it's landing gear and just moving the whole thing in front of a large green screen? This is a safer way, but does require a lot of planning to get the background video correct. I'm sure that your video editing system allows for many video tracks to be stacked. And, once you got the first mini-drone edited and looking good, you can repeat that on another video track. Thus you can make it like one mini drone is following the other. I'm just stating options to explore. This is your story and await what you finally present. I know it will be good for you do top notch videos.
 
Like @Quadflyer Gary I have always been fascinated by aerial footage so I'll share a little story. I started video production in the mid 90's and at that time was deep into RC aviation having several of my own designs and about to start a business as a model designer/maker. As we all remember, video cameras were were large and heavy back then, but model aircraft were getting bigger and more powerful. Around 1999 a friend (RC Helicopter pilot) and I decided to see if we could marry a DSLR to a 60cc gas powered helicopter.

Our first 'job' was to get photos of a 12 story condo right on the beach near Jupiter Island (North West Palm Beach). Keep in mind at this time there were NO drones and no regulations as we have today. We rigged a gimbal to the bottom of the heli that would allow me as the camera operator, to adjust and frame the image. The gimbal and camera operation total weight was about six pounds and required five or six (I can't remember now) servos along with an additional controller. We even rigged a video transmitter to beam what the camera saw, to a crude set of goggles that I wore.

So, essentially I could not see the heli - only what the camera saw and the pilot, could not see what I see. So we set about to try and get into position by me calling out direction based on what I saw. meanwhile, John was fighting a typical offshore wind around 12 MPH, in the middle of summer, starring up trying to fly and hold position. For those that have never flown, it was difficult.

In the end the task was too much. The heli was at max TO weight and had no excess to fight wind and hold position. The summer heat meant we had almost enough time to get into position before overheating and loss of power. We abandoned this project but I was not done.

Sometime around 2002, the pharmacy chain 'CVS', started carrying these little video cameras that you would basically "rent" and when the internal drive was full, you would bring it back, they would then download the video using proprietary equipment and give you back the video on a disk. They would then keep the camera which would be sent back to their place and refurbished, repackaged and sent back to sit on a shelf for the next customer. The cost was 26 dollars and the camera was a little bigger than a GoPro and the image even had sound. The resolution was a whopping 540 and the lens was very wide - probably 135 degrees. The memory would allow almost an hour of film time.

Well we did the math and figured if we could figure out how to break open the case, and retrieve the video, well then - now we've got something! Once it was known how to do it we "rented" 12 from surrounding stores. ;) Within no time I had cameras on every RC model and a buddy and I would do flights with two of my own design DV8R jets (turbine powered 160 MPH playthings) with upwards of 4 on each model attempting to get air - to - air shots. We had a little success but the video captured was mind - boggling. This was five or six years before the first GoPro.

Years ago a computer that had all of my old videos crashed and I was never able to retrieve some of those old videos and photos and have only a few photos of my original DV8R. When I started a different business and left RC design, I sold off the rights to some of my designs and the DV8R is one of them. I miss flying this old bird.

Flight5.jpg

DVonGround.jpg
 
Last edited:
So it has taken a little longer than I expected but I am rendering out my next video as I write this and plan to have it live this weekend. I thought I would give you guys a little sneak peak about what this first video is. Here is the title plate, and a frame showing the two main characters, Buck Turgensen and Johnny Johnson. ;)


VLOS Thumbnail2.jpg


VLOS Thumbnail3.jpg
 
A very nice little movie indeed. Liked the roman numeral at the beginning. The Boston Globe only costs 2 cents and they had some nifty looking cars back then. But, I think that the reason Johnny lost his drone is that he couldn't see it... he, can't even see the stop signs when driving. I don't ever want to be on the same roads as that guy. He drives too much like me!
 
  • Haha
Reactions: Ty Pilot
Well done my friend! Took me back to films in elementary school as well as the same type I had when I first joined the Air Force.

As with your other training films you have created a top notch video.
 
  • Like
Reactions: Ty Pilot

Members online

No members online now.

Forum statistics

Threads
20,954
Messages
241,582
Members
27,284
Latest member
csandoval