

- Joined
- May 7, 2020
- Messages
- 372
- Reaction score
- 321
Well, I started on my journey to build an H-plus for dirt cheap. Once I get it all put together I’m going to be afraid to even turn it on (a q500 project last year didn’t go so well). Wish me luck, at best I’ll have another H-plus for about $400 in parts and another $370 for camera...at worst I’m out $400, but it’ll be fun either way.
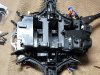
I’m trying to go off pictures from Internet (most of the electronics are easy to figure as it’s just plug and play for the most part, but I’m having trouble on where the receiver gets mounted, does anyone know location? Finding complete diagrams of h plus online are few and far between. Additionally, I’m not sure how the landing servos stay in play as there’s no screws to hold them in....likewise somewhat with the obs sensor, that just seems flimsy and it sits right on the two plugs battery, for now I just have that and the servos taped in there until I find out what holds them in place. I had the cover off my original plus yesterday and took pictures which helps but I didn’t completely rip it apart for fear of screwing something up.
Anyway, wish me luck, I’ll update post and hopefully someone else can get some answers they’re looking for in the future if I’m able to post up solutions. Searching for receiver placement on here, and online doesn’t give me anything. If I were to take a guess I’d say it sits underneath the battery frame, but can’t confirm. Nothing is going in the air until I confirm the questions I’m looking for. I’m either going to be a hero.....or a zero...in about a week from now..lol
")


")


