I recently posted about a crash and rebuild of a typhoon h. I bought it this way and I've never messed with one so I don't know much about them. The drone is flying and everything works perfectly now except the camera. I ordered all the parts I knew I needed and I am still missing the little silver "CG03+" plates for the sides as well as some screws that I can't seem to reference to start a search. Any help would be appreciated! Thanks!


You are using an out of date browser. It may not display this or other websites correctly.
You should upgrade or use an alternative browser.
You should upgrade or use an alternative browser.
CG03+ camera
- Thread starter presman30
- Start date
If you can describe or post a picture of where the screws go, we can probably tell you the sizes you need.
Did you find a vertical arm for the CGO3+ that you were looking for?I recently posted about a crash and rebuild of a typhoon h. I bought it this way and I've never messed with one so I don't know much about them. The drone is flying and everything works perfectly now except the camera. I ordered all the parts I knew I needed and I am still missing the little silver "CG03+" plates for the sides as well as some screws that I can't seem to reference to start a search. Any help would be appreciated! Thanks!


These parts:
" The camera end of the gimbal vertical arm. And the decorative covers for both sides of the camera"
See PM.
"Also can't figure out how to get this stupid antenna to fit inside the housing"
Welcome to the club.
There are at least 3 shapes, sizes of the clover leaf part. Each one more of a pain than the one before it.
Some have opted to disconnect from the WiFi board, and thread it through backwards.
You can also rotate the cover around to sort of screw the cover around the Clover leaf, and find where it comes the closest to going through. Then push the cross bar up just enough for it to pass. CAREFULLY.
The straight part of one clover leaf fits into the notch in the cross bar. There is another notch on the lower right of the cover (viewed from the front) that accommodates part of another leaf. And some covers even have a smaller notch on the lower left.
So the decals are available separately or do you have to buy the kit in your region?" The camera end of the gimbal vertical arm. And the decorative covers for both sides of the camera"
See PM.
"Also can't figure out how to get this stupid antenna to fit inside the housing"
Welcome to the club.
There are at least 3 shapes, sizes of the clover leaf part. Each one more of a pain than the one before it.
Some have opted to disconnect from the WiFi board, and thread it through backwards.
You can also rotate the cover around to sort of screw the cover around the Clover leaf, and find where it comes the closest to going through. Then push the cross bar up just enough for it to pass. CAREFULLY.
The straight part of one clover leaf fits into the notch in the cross bar. There is another notch on the lower right of the cover (viewed from the front) that accommodates part of another leaf. And some covers even have a smaller notch on the lower left.


I don't have the covers. The screws and contact board I do have.
Take a look at the CG03+ section of this document, and make a shopping list. A couple of the Attachments have lots of pictures of CGo3+ parts.
"Way To Fix Drones project"
Take a look at the CG03+ section of this document, and make a shopping list. A couple of the Attachments have lots of pictures of CGo3+ parts.
"Way To Fix Drones project"
Gimbal board lower cover
Gimbal board guard
Roll encoder
Gimbal board support
Lower wire cover
Upper wire cover
You will still need the gimbal board guard and gimbal board cover. See PM for the rest of it.

See steps 19 and 20 of attachment 20 (Slip Ring Replacement) in "Way To Fix Drones project".
Basically, lift each pin latch, pull the pins out, then pull the wire though without the connector on it. The document will show the correct order when you are ready to put them back in.
Basically, lift each pin latch, pull the pins out, then pull the wire though without the connector on it. The document will show the correct order when you are ready to put them back in.

See steps 19 and 20 of attachment 20 (Slip Ring Replacement) in "Way To Fix Drones project".
Basically, lift each pin latch, pull the pins out, then pull the wire though without the connector on it. The document will show the correct order when you are ready to put them back in.
This definitely helps but how do you lift the pins?
I guess I need to improve the steps. What Step 19 is trying to show you is to stick the point of something thin and pointed under each tab, bend the tab up enough to release the latch, and pull the wire out. See Attachment 20, Addendum 1 (General Latch and Pin Arrangement) for an idea of how the connector is made.
See also:
Attachment 18 (CGo3+ Slip Ring Cross Section)
Attachment 19 (CGo3+ Slip Ring Wire Color)
"Capsule Slip Ring 6 Circuits / Wires*1A OD7.85mm Miniature Rotating Slip Ring | eBay"
(Document attachment and addendum numbers are subject to change)
See also:
Attachment 18 (CGo3+ Slip Ring Cross Section)
Attachment 19 (CGo3+ Slip Ring Wire Color)
"Capsule Slip Ring 6 Circuits / Wires*1A OD7.85mm Miniature Rotating Slip Ring | eBay"
(Document attachment and addendum numbers are subject to change)
Last edited:
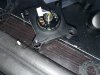
Coming together. I have to retrace the wires and make sure they are plugged in the right place but put of these 3 slots I know I am missing a board that is supposed to go to one of them. Not sure it is the middle one because i havent traced the wires yet. What goes to those 3 slots?
Similar threads
- Replies
- 1
- Views
- 260
- Replies
- 26
- Views
- 2K
- Replies
- 12
- Views
- 970
- Replies
- 34
- Views
- 2K