Hello Fellow Yuneec Pilot!
Join our free Yuneec community and remove this annoying banner!
Sign up

Mods I have done to my H, Post yours.

Joined
May 15, 2016
Messages
532
Reaction score
245
Location
Missoula Montana
These are some mods I have done. If you have any please post them.


20160905_164607.jpg
Made a battery tray from a sheet of ABS plastic, works well


20160905_164550.jpg
Extended the legs so that the camera would not hit when launching and landing on grass. Also turned landing skids inward so that it would still fit in the backpack.
Pulled the 5.8gb video antenna for better orientation.

20160905_164735.jpg
Moded my charger so it could be used with external charger. Also refocused the camera, much better, will be getting new lens soon.
 
Extended the ST16 HDMI port to a portable LCD TV screen

f600cdc4acbe7ed9de8db3ab7b874c65.jpg


Sent from my iPhone using Tapatalk
 
Mods I've done: refocused the lens. Swapped out the Lens with the Peau lens. Once focused either works well. Like the narrower FOV of the Peau lens for some applications.
Added FPVLR antennas for better range.
Yet to do: will add antennas to the H and mod ST16 to H Pro design with third antenna on outside.
 
IMG_3231.JPG IMG_3232.JPG IMG_3233.JPG
Two trackers - Trackimo GPS tracker that is tied to you phone. $50 a year tracking using cellular, The smaller circle is a pinger that I use with a directional antenna and a Carrier Wave Scanner. This is the same that they track small animals with. I get about 1/2 to 1 mile line of sight pings to the receiver. If it ever flys away or goes down I can generally locate it with the Trackimo and narrow it down easily with the radio freqs pinger. I also have flytron strobes purchased from RMRC (Ready Made RC) based in the states for $13 each (two reds and two whites) on the H. I put a little piece of velcro on the arm near the body and another on the retractable legs. It works perfectly and during the day I put all 4 facing rearward for orientation. It helps so much to know you are looking at the back end

.FullSizeRender (7).jpg
Another mod - The camera gimbal is barely held on by a couple plastic rails. It is done on purpose so the energy of a bounce, scrape or light crash pops the camera off the craft to keep it from getting destroyed. Fine if you can see the H but if you strike a limb the camera will fall and you may or may not find it. Drill a very small hole in the empty gimbal hole. Loop very loosely a small piece of fishing line or dental floss through the holes. String must be loose and floppy, so do not tighten down to keep the gimbal working correctly. This will keep the camera and gimbal attached so you can bring it home and not search the woods and fields for it.
 
After you removed the glue from the lens and adjusted the lens, do you add new glue? Once you got the lens focused correctly, how do you keep the lens from moving on it's own due to the vibrations from flying the drone?

PTFE plumbers tape seems to be the suggestion a few weeks ago. One layer around the thread.
 
View attachment 2919
Two trackers - Trackimo GPS tracker that is tied to you phone. $50 a year tracking using cellular, The smaller circle is a pinger that I use with a directional antenna and a Carrier Wave Scanner. This is the same that they track small animals with. I get about 1/2 to 1 mile line of sight pings to the receiver. If it ever flys away or goes down I can generally locate it with the Trackimo and narrow it down easily with the radio freqs pinger.

Ummmmm.

Are these mounted close to the GPS module location on the top of your Typhoon H ?

If they are, it may not be a good idea to mount them that close to it. It's a possibility they may affect the performance of the GPS module.

(don't know for sure, just a thought)


Sent from my iPhone using Tapatalk
I thought the same thing and tried different mountings locations. I have a lot of hours flying them this way and I have had zero issues with it. Everything operates as it should and have never had the first sign of interference.
 
Here is a video with a bit more details but in a nutshell is husky box with a 26" LCD TV powered by a 700W inverter using a duracell deep cycle battery connected to the ST16 via the HDMI port for realtime view of your CGO3 camera.


Sent from my iPhone using Tapatalk
 
  • Like
Reactions: PPS
Here is a video with a bit more details but in a nutshell is husky box with a 26" LCD TV powered by a 700W inverter using a duracell deep cycle battery connected to the ST16 via the HDMI port for realtime view of your CGO3 camera.


Sent from my iPhone using Tapatalk
Very cool Thanks
 
Not sure if this counts as a mod, but after mistakenly ordering a CGO3 mount instead of the CGO3+ I had to made some tweaks to make it compatible.

Some of you may find it weird that I just didn't sent it back in exchange for the appropriate part but there's a good reason for that:

The reason: I mistakenly ordered the part online (which is very cheap) but there's no suppliers here in Mexico, so the shipping cost was more than double the cost of the part itself, also the shipping took waaay too long to consider sending it back and wait for the return and then add the extra shipping costs.

They're based on the same mold, but with a few key differences:

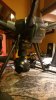
1) The most obvious is the single contact orifice, which not only implies the hole itself, but also a different structure on the back in order to fit the larger back cover that holds the contact board in place.

DSC_0033.jpg


DSC_0039.jpg


2) 3rd screw thread is obviusly in a different position because of the size of the back cover so the most difficult part was to move the small piece with the thread to its correct position, also carefully glued using black epoxy and let harden overnight

DSC_0043_1.jpg


3) The mount "legs" are shorter, and in turn the rubber dampers are longer to compensate (therefore softer and jigglier) and there are no security plastic pins. Using original CGO3+ dampers is not possible because they're shorter and the bottom of the gimbal motor makes contact with the mount.

DSC_0061_1.jpg


So I removed the extra lenght from each "leg" from the broken CGO3+ mount (which is clearly visible since the "extention" has a different shiny finish rather than matte, so no need to measure) to transplant them to the new CGO3 mount.

DSC_0072.jpg

DSC_0074.jpg


4) Before installing the "extentions" to the new mount, the bottom of the "legs" of the recipient had to be removed to be able to properly fit the original CGO3+ rubber dampers.

DSC_0077_1.jpg


5) Once all the "legs" where completely bottomless carefully install the "extentions" from old mount to the new one using some nice black epoxy glue.

DSC_0080.jpg


Once everything was in place, I let it cure for a whole day before attempting to reinstall, once everything is back in place the mount cover hides everything, and its completely invisible, the shorter railing also fits perfectly, it slides all the way back until its secured just like its supposed to be.

DSC_0067.jpg


So as you can see, it is not "modded" per se, but the CGO3 mount had to be custom fit for the CGO3+

I know most of you would've just ordered the right mout but I didn't want to spend on more shipping costs and wait for another week and a half for it to arrive. Also I don't mind doing this kind of work on a replacable part

Greetings!
 
Last edited:
  • Like
Reactions: Brent

New Posts

Members online

Forum statistics

Threads
20,955
Messages
241,599
Members
27,285
Latest member
hendrtiz