

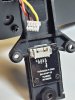
Your CGO3+ has 6 pins. Just fit your CGO3+ on the steadycam. It lines up perfectly with no additional wiring. It only uses 3 of the pins. As long as you have the upgraded battery (Not the 8AA version. That version doesn't supply enough voltage to the camera), you will be good to go.
I have the 8AA version and the CGO3+ camera works just fine so it does supply enough voltage to the camera. The difference is that the 8AA batteries will drain pretty quickly. I'm using rechargeable batteries until such time as I upgrade (if you can call it that) to a lipo.

")
