Hello Fellow Yuneec Pilot!
Join our free Yuneec community and remove this annoying banner!
Sign up

How To: Basic procedures with the H520 and cameras

The first thing is to thank @claudius62 for the effort put into discovering this "function". Hopefully Yuneec will implement it quickly and simply in the contextual menu of the flight window. I think it's worth it.

HOW TO USE THE "R.O.I" IN MANUAL FLIGHT

The function "R.O.I" can be used in circuit programming in "DataPilotPlanner".
But one can, and it is very advantageous, to use a "R.O.I" in MANUAL flight to focus on a single objective to film or to photograph.
This is very simple.
Just enter "DataPilotPlanner", put a "R.O.I" on the objective to do, to set the altitude of the subject to film (caution altitude is relative to the Home altitude).
Do not forget to complete Mission Start anyway and do not check the speed because we will remain in manual control.

16295


Once finished, send the mission to the H520.
Return to the flight screen where the slider appears at the bottom of the screen to start the mission.

Before starting the mission, lower the two switches "Tilt Mode" and "Pan Mode".
This will eventually be able to reassemble the aim on the "R.O.I".
These switches will be put back in the up position before the end of the mission to disconnect the camera sighting on the "R.O.I".

16296


16297


Dragging the Slider to the right
1) THE CAMERA points immediately towards the goal to reach (Precaution see *)
2) The engines start. Take off manually or with the automatic Take-off.

Now you can fly freely and the camera will stay fixed on the "R.O.I"

(*) The camera has an angle of + 30 ° to -90 °. It is obvious not to program a point of aim that will be too high compared to the H520 at takeoff because the camera points immediately to takeoff to this point. I think the cardan is not going to like it at all and that will disturb you during a good moment.
For that, I recommend to create the mission, to save it. Take off to get up at the hight to the "R.O.I". Send the mission to the H520 at this time and begin the flight.

Before posing the H520, return both "Tilt Mode" and "Pan Mode" switches to the up position to disconnect it from the "R.O.I" function.
Caution, stop the"R.O.I" if the point becomes too high compared to the camera.
16298


Posing the H520 ends the mission.

From there, several manual missions "R.O.I." can be linked by doing several "R.O.I." independent.
We take care of "R.O.I." 1, in stationary one loads the mission "R.O.I." 2 we launch, the camera will get this point, we do what we have to do, etc ...

To view this content we will need your consent to set third party cookies.
For more detailed information, see our cookies page.

Nice, @arruntus!

May I ask for a translation? What does “posing the H520” actually mean?

Thanks!

Jeff
 
Saying "posing the H520" is the same as saying "land the H520". In other words, before landing deactivate the ROI because if the camera looks at a point that is higher than the home, you force the gimbal because it tries to move above its physical limits.

Don't tell me my translator's gonna work better than yours that comes as standard ? ?
 
Saying "posing the H520" is the same as saying "land the H520". In other words, before landing deactivate the ROI because if the camera looks at a point that is higher than the home, you force the gimbal because it tries to move above its physical limits.

Don't tell me my translator's gonna work better than yours that comes as standard [emoji16] [emoji23]

Thanks @arruntus!
 
Another equatorial very clear and that can come to us well

Landing Gear Motor Assembly Repair

To view this content we will need your consent to set third party cookies.
For more detailed information, see our cookies page.
 
E90 Fix for Gimbal Vibration

Thx @Steve Carr

If you have a E90 camera that buzzes or vibrates this may fix the problem.

Download the attached file.
Unzip (uncompress) the file. The file name should be gimbal.yuneec
Copy the file to a formatted sd card that you normally use in the camera.
Install the card in the camera and watch the video below (the fix is the same for the C23 & E90)

NOTE: The file will be renamed gimbal.yuneec.updated after the install.

The testing and procedure was a team effort including @DCH and @WTFDproject. They spend many hours to provide this information. Thank you both.


To view this content we will need your consent to set third party cookies.
For more detailed information, see our cookies page.
 

Attachments

Last edited by a moderator:
I add this great video to help anyone who wants to reset the ST16S factory and update all the software. Thanks Steve :D

Reset the ST16S to factory settings and update

To view this content we will need your consent to set third party cookies.
For more detailed information, see our cookies page.
 
Is there anyway the the nice feature of legs raising automatically when signal is lost it RTL has been engaged?
Transmitter Loss Fail-safe

What happens when the ST16S signal is lost?

To view this content we will need your consent to set third party cookies.
For more detailed information, see our cookies page.
 
Yuneec CGOET for the H520

Configuration and features.

To view this content we will need your consent to set third party cookies.
For more detailed information, see our cookies page.

How to edit the thermal images of the CGOET obtained with the H520

How to edit the video in which the two video tracks come.

To view this content we will need your consent to set third party cookies.
For more detailed information, see our cookies page.

Lumafusion CGO-ET How to

Another way to work with the thermal images and on this occasion thanks to Haydn

To view this content we will need your consent to set third party cookies.
For more detailed information, see our cookies page.

CGO-ET - how to view and edit "hidden" thermal video

Uwe Loewer explains how to "extract" the thermal images from a video recorded with a CGOET. If you don't have an advanced video editor you can use this procedure

To view this content we will need your consent to set third party cookies.
For more detailed information, see our cookies page.


Reset the camera wifi password

The default wifi password for connecting the camera is 1234567890. If you change it and cannot remember the new password, you need to reset the camera in order to reconnect the camera.

It is necessary to press the hidden button at the bottom of the camera at the same time that you press the turn on button. Keep thouse button press for 5 to 6 second. The password is now returned to the default password.

The next step is to connect the table to the e90 using the android wifi wihouth usimg the data pilot. When you restart you will automatically have the link connected.

47f8c506-a854-4d25-9921-a14a02c2b166-jpeg.7509


Thanks @hoynader for getting the information ;)

Lower the landing gear

Sometimes, no matter what is the reason, the landing gear stays up and the switch that allows you to lower it does nothing. What should we do to solve it?
  • We must remove the camera from the H520.
  • We shut down the aircraft.
  • We turn the aircraft upside down.
  • We turn the H520 on (still face down), and it will automatically lower the landing gear.

Transfer flight plans from desktop computer to ST16S

In order not to repeat it twice since it occupies a lot I put the link directly to the post.

Transfer flight plans from desktop computer to ST16S

Changing the E90 dampers

Video where we see how to change the dampers of the E90, put the safety catch and some curious thing.

To view this content we will need your consent to set third party cookies.
For more detailed information, see our cookies page.
Solved!

I also had the Incorrect Password message and authentication problem with E90 camera. The problem was after I updating the software.
But the problem is solved!

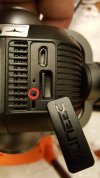
After several hours of playing with the E90, the camera was successfully reset. A little note! Before, I did a wrong reset. It has to be:
- drone (and camera) power supply has been on for a long time;
- I press the reset button for about 10 seconds (the one closer to the flap mounting);
- the camera lights up red for a moment;
- turn off the drone;
- turn on the drone;
- on the console ST16 under Android, I logs into the E90_xxx network with the password 1234567890 and now I gets the message "Connected" - OK!;
- I enter the drone control program and everything works right away - done!

Good luck!
Adam M.
 

Attachments

  • 20210124_130255.jpg
    20210124_130255.jpg
    6.2 MB · Views: 7
I am sure it is in there, but I just didn't see it. Is there instructions on how to setup the 520, where I can select a moving object, and have it chase it?
 

New Posts

Members online

Forum statistics

Threads
21,147
Messages
243,836
Members
27,827
Latest member
larue